Showing posts with label 3Ds Max. Show all posts

3Ds Max - How to create Coke Glass [Pt.1]


Welcome back for more 3Ds Max tutorials, and today we're going to be talkin' about how to create the coca-cola glass.
This maybe hard for some people, as some experiences are required to do this, but don't worry, I'll try to explain it slowly and as clear as I can.

As always, if theres something that's not clear, you can comment on the comment sections below, and I'll gladly help you! :)
So let's get started.

In this first part, I'll divide into 2 sections, the glass and the cola.

1. Creating The Glass
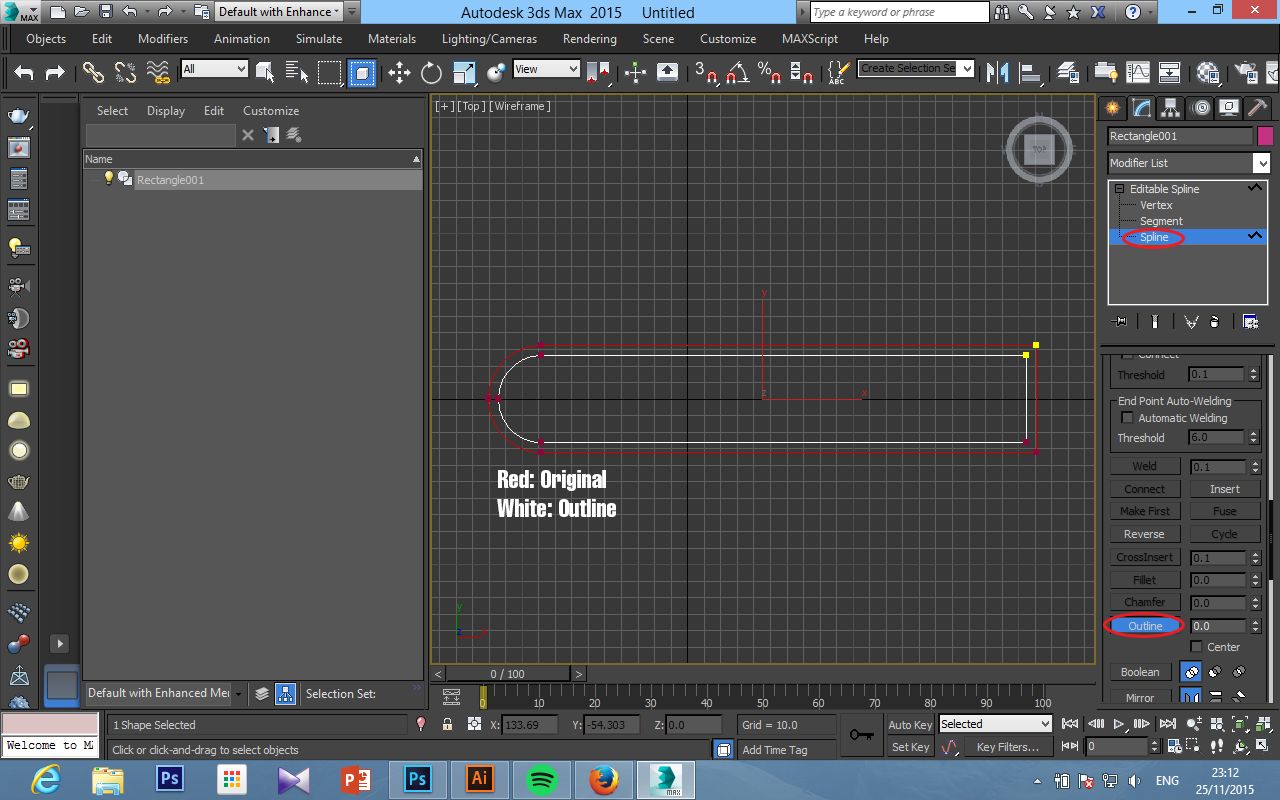
Ok, it's very simple, and if you ever read my previous tutorials about how to make a cup and plate, the way to do it, it's the same. We use lines to do this.
So, let's get over to the line sections, don't forget to change the setting as Corner for initial type & Smooth for Drag Type.

Now after it's done, it's time to do some modifications, to make it even better.


After we done that, we're going to move our pivot center, we don't want to make it on the middle of the glass, but to the bottom. So it will help us on the scale, etc later on. To do this, with the snap tool on, go to the Hierachy Panel, press Affect Pivot Only, then drag our pivot points to the bottom as below picture.

Time to turn this lines into 3D object, the way it's the same as the previous tutorials, go to modifications panel, search and apply Lathe modifier to it.

Right click and convert this model into editable poly, select the bottom part, and erase it.

Then in the border selections, we make a cap for it, the reason is because we don't wanna have any segment on the bottom, so when we smooth it later, the edges wont be so edgy and sharp.

Now chamfer it a little.

To make the sides, as the original model of the glass, theres a surface that is slightly goes in, and to make it, go to the polygon mode, and we use extrude.


2. Creating the Water / Cola
Now we have our glass, but where's the cola? Well, let's make it!
First we need to clone our glass.

Go to the side viewport, inside the polygon mode, select the top part of the glass that we copied (Water), and delete it.

Then resize it, so it won't exceed the glass.

After that, go to the verteces mode and drag the bottom part slightly upward, so by doing this, we make a little space between the water and the glass.

3. Finishing touch
Now, let's add a shell modifier to our glass so it has a thickness.

Go to the bottom verteces, and drag it downward.

And delete the bottom part.

Now, add the turbosmooth modifier, so it has a smoother edges, and on the bottom part, cap it.


Back to the water, on the border mode, cap it.

And that's all for our first part, I hope you guys enjoy it, and sorry if I'm a little bit a rush, I'm going to class now, see you guys later for the next part! :)
1 part / week.


3Ds Max - How to create a carpet


Good morning everyone, since I've been posting lesser nowadays, so I'm going to post another tutorials, on how to create a carpet, or some people may call it "rug"? or "Shaggy rug"?
I don't know. Let's just call it carpet, shall we? XD

I've been surfing the internet for quite some times, and actually there's so many way to do this, but we'll be covering only one, which is by using "Vray Fur".

But before we begin, there will be some materials that is needed in this tutorials, feel free to download!
Fur Normal Map
Texture

1. Change our model's scale
I don't know if I should do this step in the future, since I assume everyone has already known how to did this as I've repeated it many times, but this time we'll be centimeters.

2. Setting up the plane
It's not like we could directly put fur on the object. So we need to make the body / plane first, thus, we'll be using a chamfer box to make it.

Now it's time to put a noise modifier, as we know, carpet is not as smooth as a glass, it's abit rough. So, go to modifier panel, pick noise, and set as the setting below.

3. Setting up the fur
At this time we're going to use Vray fur, and this can be done in two ways. Either we add a VrayFur modifier, or we can just directly click on our chamferbox, and add a vrayfur from the menu as the picture shown.

At this momment, don't be shock of the hairy fur that pop-ups all of sudden, let's follow up this setting.

We probably feels the hair just so little, and not that many by now, but it doesn't mean it's not hairy. Try to render, and you'll see a bunch of fur has covered up almost all entire plane.
And, still inside the Vrayfur, in the mapping sections, put our normal map to both bend and initial directions.

4. Textures setting
This probably my first time giving guides on materials, so here's the textures' setting that I'm using.

This is the basic setting that we're going to use, in the diffuse button, click on the small square behind it, and pick the bitmap of our texture. You can use your own, or use the one I provided on the tutorials.
And for the reflect, click the small square behind it, and click on mask, and follow this setting.

Last but not least, to give it a little bit more detail, let's add bump, so copy the bitmap of our textures, and drag it to bump column.

And that's all for the tutorials, I hope it's really helping, and as always, don't forget to comment if you have other way to do this, and dont hesitate to share it, so more people will be helped. Sharing is caring! :)

3Ds Max - How to create a book


Hello guys, after quite along time, finally we're back in more tutorials, and at this momment we're going to be talking about how to create a simple book, with a hard cover, it can be a diary, or journal book.
This step is quite simple and short, but probably I won't be teaching about UV Maps at the momment, but one day I will! :)
So, without any further, let's get started, shall we?

1. Change our model's scale
Okay, it's time for us to change our scale model, and this time it's a generic units we're going to be using. To change it simply go to Customize > Unit Setup > Generic Unit.

2. Modelling the Cover
Actually there's so many way to make the cover, but this time I'll create it by making the rectangle.

Once we have that, simply right click on the rectangle, and convert to editable splines.
Then, choose Vertex, and select both of the vertex on one side, then click on fillet, and drag our mouse to make our edges bend or half circle.

Next, change the mode into splines, and select all (Ctrl + A). From here, we're going to make the outline, to do so, in the splines panel, go and click the splines, then drag it, until the desired amount of thickness.

Now time to bring the 2D rectangle into 3D shape, by adding the Extrude on modification panel.

Now it's time for us to get rid on of the side, and As we all know, we're going to use a Boolean.
But first, we should make another box, which will cover up the part we're going to delete to.

To use boolean, first we need to click on the shell, or the original shape, then click ProBoolean, then set the target, and click on the box we just made. Boom! It's like magic, the path is gone.

3. Modelling the Paper
Okay, to do the paper, we don't need to create each paper since it's gonna take alot of time, so we'll be using the same method as the above, except we don't give outline on it.

Repeat the steps, change into editable splines, then fillet one of the sides.

From here, we can just skip the outline, and go extrude it.

That's all for today, and I'm going to sleep, goodnight guys!
I hope this tutorials can help all of us to improve our skills in 3Ds max. :)


3Ds Max - How to create a matress


Hello guys, after few days busy doing some work, we're now come back for another tutorials, and in this chance, we're going to learn how to create a matress.
First of all, you don't need to follow 100% of what I'm doing, it's just for some guidance, as there's many way to create a matress, but at this momment, we'll be covering up one way to create it.

And without any further, let's open up our software, and get started.

1. Change our model's scale
As usual, let's change our model setup, it depends on what you want to use actually, but I'll be using cm at this time. To change our model's scale go to Customize > Unit Setup > Metric > Centimeters.


2. Modelling the bed
As we know before, there's many way to create matress, but today, we'll be covering only one way to create it, by using a box. 

So, first of all let's create a box with this setting.

Make sure to put alot of segment to our box, we'll know the reason later on.
Then, what we need to do next, is to go to the Modifier panel and choose Relax modifier, and put this setting.

Soon we'll realise it's becoming much smoother, but decreases in size, but don't worry it's normal. And this is also the reason why we should put lot of segment, because, if you only have few segment, and you put this modifier, the bed will become so small, and the shape will turn into something like chamferbox shapes.
Next, in the modifier panel, find and choose Turbosmooth modifier.

The results will be even smoother, and beautiful. But it's end up here, what we need to do now, is to make a shape around the matress. There's two ways to do this, either we put a "Edit Poly" modifier, or right click, and Convert to Editable Poly.

After we done that, choose the line section, and choose the line like the picture below. Just select one on each side, then press Loop. It will directly loop all the line we chosen just now.

Now, scroll down and find "Create shape". Once we click it, choose smooth, and a shape will be made.

Don't panic if the shape isn't going out, on the left panel, go and find the shape, and click it, and tick the checkbox for the shape to be appear, and change the setting as below.

To put a little bit more realism, we could make some bumps on it's surface. And to do that, scroll down, and find "Push / Pull" Button, and change the setting as below.

 By the end, we'll have results like this.


3. Assigning the materials
Ok, this probably the first time, we cover up the materials.
I'm using Vray currently, but of course you guys still can follow up with different kind of materials.
So, first of all, change the diffuse color to white (Or whatever colour you want), then scroll to the bottom, and in the "Maps" section, find bump and select the box behind it, select bitmap, and choose the picture, which can be downloaded here.

We probably wondering, why the texture's is really weird, once again, don't be panic, let's go and add a UV Map modifier on our bed, and change the setting as below picture.


In case, what we're seeing isn't the colour we pick, on the material editor, click on the small icon which called "Show shaded in viewport", this will fix the problem. :)

So, in that way, our matress is done! Sorry I'm a little bit rush in some part, it's middle of night, and I'm feel really sleepy, so I'm going to bed now, and see you guys tomorrow! :D
I hope this tutorials will help, and I do hope, in the future, I could give more advanced tutorials, like room, and some setup.